
Wisp Science使用技巧:专家
查看原文整理文献时,希望 AI 像一位细心的阅读助手;检查分析过程时,希望它像一位严格的审查员;准备组会配图时,又希望它熟悉科研图形的表达方式。
这些要求可以保存在 Wisp Science 的 专家 中。以后开始同类任务时,选好专家,再提供这次的材料和目标,就不必反复粘贴整套工作要求。
前面介绍过 Skills 和 轨迹。这一篇结合专家设置页,介绍三个内置专家、两种创建方式,以及保存之后怎样真正用起来。
先认识专家:为一类工作保存角色、指令和配置。
一个专家可以有自己的名称、描述、工作指令、模型绑定和技能选择。例如,“论文阅读助手”可以固定要求:区分作者结论与读者推测,为关键结果标注原文位置,材料不足时明确说明。
| 配置 | 解决什么问题 |
|---|---|
| 专家 | 这次由什么角色工作,长期遵循哪些要求 |
| Skill | 某项具体任务按什么步骤和模板完成 |
| 模型 | 由哪个已配置的模型执行工作 |
| 本轮消息与附件 | 这次处理什么材料,交付什么结果 |
专家的指令会追加到 Wisp 的基础提示词之后。保存专家不会训练出一个新模型;它让已有模型带着这套要求工作。技能和工具是否可用,仍取决于实际配置与执行环境。
打开“设置 → 专家”,先读懂这张列表。
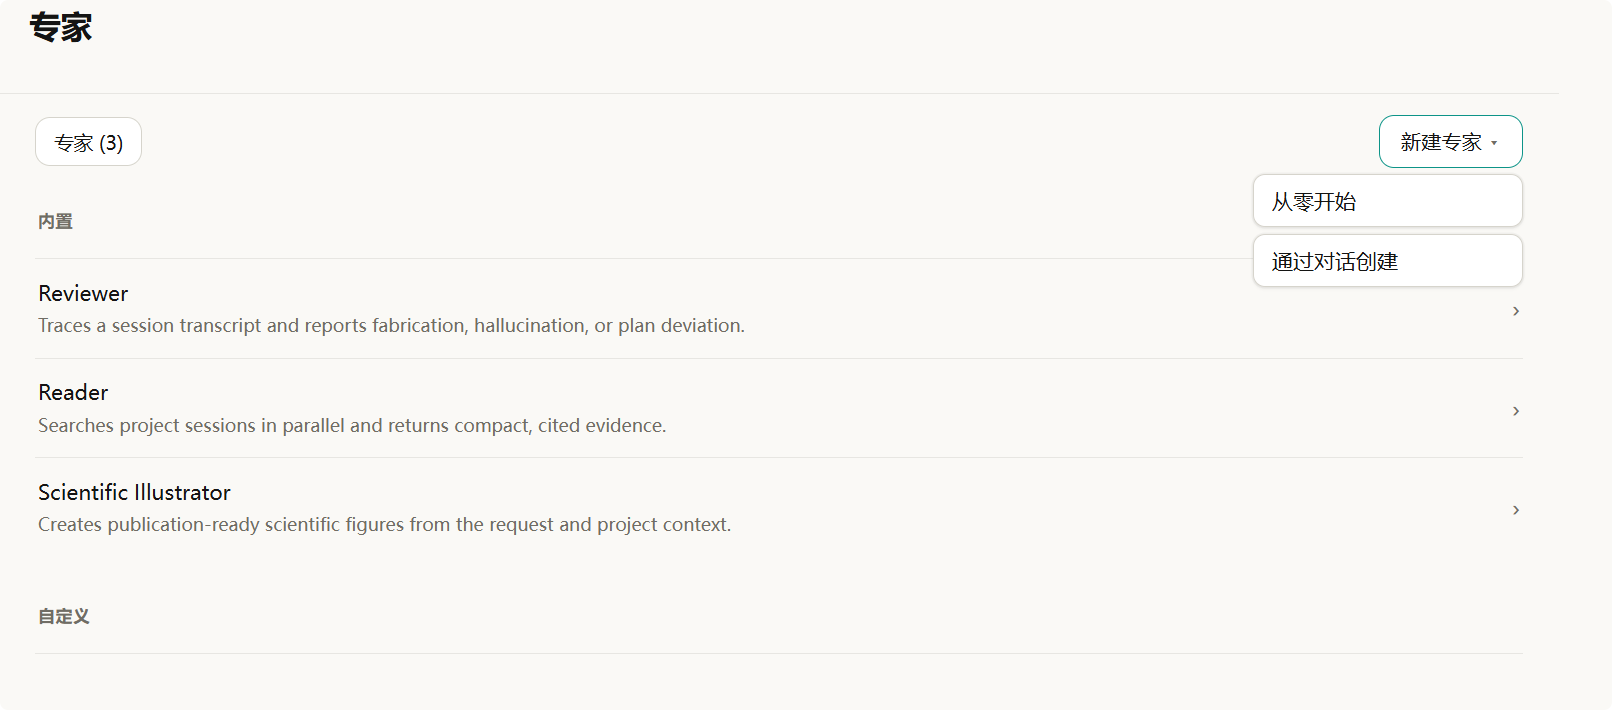
图 1:用户提供的专家设置截图。此时共有三个专家,自定义区域尚为空;右上角展开了“新建专家”菜单。
页面分为 内置 和 自定义 两组。左上角“专家 (3)”表示当前列表共有三个专家;点击某一行,可以进入详情查看配置。右上角 新建专家 提供两条路径:已经想好规则,就选 从零开始;想让 Wisp 帮忙梳理需求,就选 通过对话创建。
截图中的三个内置专家各有明确用途:
| 专家 | 适合做什么 | 常用入口 |
|---|---|---|
| Reviewer | 检查会话记录中的编造、无依据陈述与偏离计划的情况 | 在已有对话中使用 /review 发起审查 |
| Reader | 从已保存的项目会话中检索与当前问题有关的内容,返回带出处的证据 | 在消息中引用项目或历史会话 |
| Scientific Illustrator | 根据任务和项目材料制作科研图形 | 新会话中通过 Agent 菜单选择专家 |
内置专家的工作指令不可编辑,也不能删除,但可以进入详情调整模型等可配置项。希望采用自己的工作规范时,可以创建自定义专家。
Reviewer:分析完成后,再检查“说的”和“做的”是否一致。
例如,助手说“已完成缺失值处理并保存结果”,你可以在这段对话中输入 /review 并发送,发起一次审查。Reviewer 会根据会话记录检查这类声明是否有操作记录支持,以及执行是否偏离用户要求。
它适合帮助发现问题线索。审查结果仍需要结合 轨迹、原始文件和实际输出核对;一次审查通过不能替代科研结果验证。
进入 设置 → 专家 → Reviewer,可以选择审查使用的模型或后端。Reviewer 还支持跟随会话以及已配置的 ACP Agent 等选项。这里的 测试 Reviewer 会执行一次真实模型调用,适合在保存前检查配置是否能正常返回审查结果。
Reader:让历史会话成为这一次回答的材料。
假设同一个项目里已经讨论过样本排除标准和分析阈值,新开会话时不想重新解释,可以在输入框输入 @,选择相关项目或历史会话作为引用,再发送:
请根据我引用的历史记录,整理我们已经确认的样本排除标准。列出每条标准的出处,把尚未确认的建议单独列出。
Wisp 会让 Reader 从这些已保存的会话中寻找相关证据,再供主 Agent 回答当前问题。Reader 的工作范围是被引用的会话记录;如果要阅读一篇新论文,仍要提供 PDF、正文或可访问的材料。
Reviewer 和 Reader 不出现在普通会话的专家选择菜单中。 它们通过各自的审查与引用流程工作。在设置里看到它们,并不意味着需要先把当前对话切换成 Reviewer 或 Reader。
Scientific Illustrator:把图的用途、依据和交付格式说清楚。
新建会话,在输入框的 Agent 菜单 → 专家 中选择 Scientific Illustrator,再发送绘图需求。例如:
请为组会制作一张可编辑的 SVG 流程图,保存到 figures/sample-workflow.svg。内容依次为:样本采集、RNA 提取、文库构建、测序、数据分析。使用中文标签,横向排版。这是一张方法示意图,不添加样本量或实验结论。完成后检查预览中的文字和箭头是否清楚。
这个内置专家预设了 figure-style 和 figure-composer 技能。明确要求 SVG、矢量或可编辑图时,会按直接生成 SVG 的方式工作,并通过 PNG 预览检查效果;明确要求 PNG 或图像模型生成时,需要配置可用的图像生成模型。
未指定格式时,有可用的图像生成工具会优先走 PNG 图像模型方式,否则采用 SVG 方式。希望后续修改文字和布局,就在任务里明确写“可编辑 SVG”。如果要画数据图,还应附上真实数据,并说明列名、单位、分组和统计要求。
创建自己的专家,第一种方式是“从零开始”。
进入 设置 → 专家 → 新建专家 → 从零开始。以“论文阅读助手”为例,可以这样填写:
| 字段 | 示例 |
|---|---|
| 名称 | 论文阅读助手 |
| 描述 | 根据已提供的论文材料整理阅读笔记,保留证据位置 |
| 模型 | 先使用“跟随当前模型”,也可以绑定已配置的对话模型 |
| 技能 | 初次使用保留“继承项目设置”;需要固定范围时再选择具体技能 |
名称必填。指令虽然可以留空,但把要求写具体,才更便于复用和检查。下面这段可以直接放入 指令:
你是我的论文阅读助手,帮助我为组会整理可核对的阅读笔记。

开始前确认我提供的是全文、摘要还是部分摘录,并在笔记中说明材料范围。
按照“研究问题、材料与方法、关键结果、局限性、对当前课题的启发”组织内容。
为关键结果标注可核对的页码、章节或图表编号;没有定位信息时明确说明。
分开表述作者报告的结果和你的推测,不补写材料中没有的数据或结论。
遇到缺失的实验条件、样本量或统计方法,标为“材料未提供”。
需要保存文件时,使用我指定的位置;未指定时保存到 notes/papers/ 下的新文件。
最后列出仍需回到原文核对的问题,并报告保存路径。
点击 保存 后,新专家会出现在 自定义 区域。以后点击它的名称即可修改配置;自定义专家也可以从列表中删除。
技能选择最容易漏掉的一点:取消继承后,需要主动勾选。
勾选 继承项目设置 时,专家沿用项目的技能配置。取消勾选后,可以在搜索框输入关键词,选择希望这个专家使用的技能;已选技能会显示在上方,也可以移除。
取消继承却一个技能都不选,表示不带任何技能。 它不表示自动选择所有技能。
例如,你已经按 Skills 教程 创建并导入了 lab-paper-note,就可以搜索并选中它,把阅读笔记模板与“论文阅读助手”配合使用。技能需要先安装并能被项目发现;填写专家指令不会自动安装依赖。
第二种方式是“通过对话创建”,让 Wisp 帮你梳理要求。
点击 新建专家 → 通过对话创建 后,Wisp 会打开一段新会话,自动发送创建专家的访谈请求,了解用途、语气、工作风格、所需技能与数据源,以及适合的模型档次。这一步会使用模型,需要先完成模型配置。
你可以这样回答:
我想创建一个“组会准备助手”。主要根据我提供的论文和实验记录整理组会提纲,语气简洁。每次先问清汇报时长和听众背景,再组织研究问题、方法、主要结果与待讨论问题。所有数据和结论都要有材料出处;没有提供的数据不要补写。暂时继承项目技能,模型跟随当前配置。请把这些要求保存成专家。
对话创建流程会引导 Agent 调用 save_specialist 保存配置。看到回复后,再回到 设置 → 专家 → 自定义,确认专家确实出现,并打开检查指令、模型和技能是否符合预期。
如果它只是给出了一段角色介绍,列表中还没有新专家,可以继续要求“请将这个配置保存为专家”。创建完成的对话用于梳理配置;试用这个专家时,再开一段新会话。
保存之后,还需要在新会话里选中它。
完整流程是:
- 回到项目,新建一段会话。
- 在发送首条消息前,打开输入框的 Agent 菜单 → 专家。
- 选择“论文阅读助手”,确认会话顶部出现专家名称。
- 附上一篇论文或一段摘录,再说明本次任务。
例如:
请根据我附加的论文摘要整理阅读笔记,重点关注研究问题和关键结果。只使用这份摘要能够支持的信息,把笔记保存到 notes/papers/ 下。
首条消息发送后,当前会话的专家选择会锁定。 想更换专家或回到普通对话,需要新建会话,再选择其他专家或“无”。设置页中的保存操作本身不会把已有对话切换到新专家。
普通专家角色用于 Wisp 内置 Agent。Reviewer 单独支持 ACP 审查后端;不要据此假定所有自定义专家的指令和技能配置都会传递给外部 ACP Agent。
用一份熟悉的材料,检查专家是否真的帮你省下重复工作。
第一次试用时,可以挑一段你已经读过的摘要,检查三个地方:结构是否符合要求,关键结果是否有出处,是否把材料缺失的信息写成了确定事实。发现问题后,回到专家指令中补充具体规则,再开新会话验证。
| 现象 | 优先检查 |
|---|---|
| 已保存专家,但当前对话没有使用 | 是否新建会话,并在首条消息前选中它 |
| 专家菜单变灰 | 当前会话是否已经发送过消息 |
| 找不到 Reviewer 或 Reader | 使用审查或项目/会话引用入口,它们不在普通专家选择列表中 |
| 专家没有使用预期技能 | 是否取消继承但未勾选;技能是否已安装并可被发现 |
| 对话创建后列表没有新增 | 是否实际完成保存;回到设置检查,必要时继续要求保存 |
| 科研绘图没有得到想要的格式 | 是否明确指定 SVG 或 PNG;图像模型方式是否已经配置 |
可以先保存一个你每周都会用到的角色:论文阅读助手、组会准备助手,或者实验记录整理助手。把稳定的要求放进专家,把每次变化的材料和目标留在消息里,再用实际结果逐步修订指令。
本文依据撰写时的 Wisp Science 实现整理。截图展示专家设置界面;文中的提示词与文件路径用于教学,不代表已经执行的科研任务。不同版本的界面文字可能略有差异。
Reading papers, checking an analysis, and preparing figures call for different working habits. Wisp Science Specialists let you save those recurring requirements, then supply fresh materials and a concrete task each time.
Following the tutorials on Skills and Trajectory, this article covers the three built-in Specialists, both creation paths, and how to use a saved Specialist in a conversation.
A Specialist saves a role, instructions, and configuration for recurring work.
A Specialist has a name, description, instructions, model binding, and Skill selection. A “Paper reading assistant,” for example, can consistently distinguish the authors’ findings from interpretation and identify where each finding appears in the source.
| Component | What it contributes |
|---|---|
| Specialist | The role and standing requirements for the work |
| Skill | Steps, templates, and resources for a particular task |
| Model | The configured model that performs the work |
| Message and attachments | This task’s materials and requested deliverable |
Specialist instructions are appended to Wisp’s base prompt. Saving a Specialist does not train a new model. Skills and tools still depend on your actual configuration and execution environment.
Open Settings → Specialists to see the available roles.
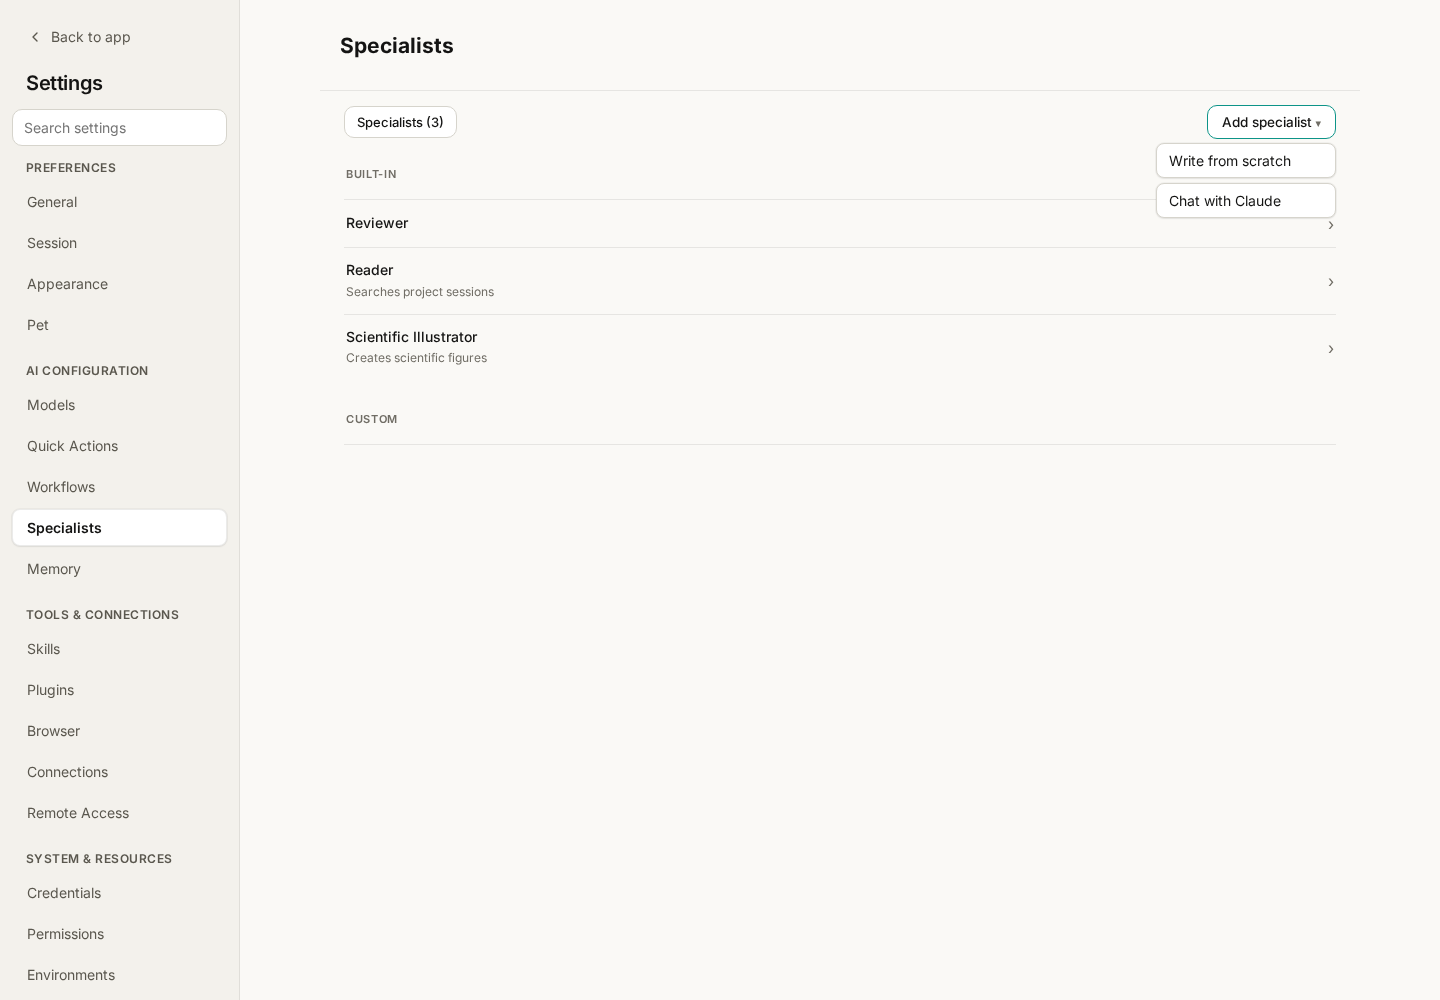
Figure 1: The English interface, captured with the mocked Tauri bridge for this tutorial. It shows the same three built-in Specialists and creation menu as the user-supplied Chinese screenshot.
The list has Built-in and Custom groups. The count indicates how many Specialists are listed. Click a row to inspect its configuration. Add specialist offers Write from scratch and Chat with Claude, the current English label for creating one through a conversation.
| Specialist | Purpose | Usual entry point |
|---|---|---|
| Reviewer | Find fabrication, unsupported claims, and departures from the requested plan in a transcript | Send /review in an existing conversation |
| Reader | Retrieve relevant evidence from saved project conversations, with source references | Attach a project or historical conversation reference to a message |
| Scientific Illustrator | Create scientific figures from the request and project materials | Select it in a new conversation’s Agent menu |
Built-in instructions cannot be edited, and built-in Specialists cannot be deleted. Their details expose configurable settings such as model selection. Create a custom Specialist to use your own standing instructions.
Reviewer checks whether reported work is supported by the conversation.
If the assistant says it handled missing values and saved the result, send /review in that conversation. Reviewer checks the transcript for evidence supporting such claims and for departures from your instructions.
Use the report to identify issues worth investigating. Verify findings against Trajectory, source files, and actual outputs; passing a review does not establish scientific validity.
In Settings → Specialists → Reviewer, choose the review model or backend. Reviewer also supports following the conversation and using a configured ACP Agent. Test Reviewer makes a real model call to check whether the configuration returns a valid review result.
Reader brings relevant historical conversations into the current task.
Suppose a project already contains discussions of sample exclusion criteria and analysis thresholds. Type @ in the composer, select the relevant project or historical conversation, and send:
From the referenced discussions, summarize the sample exclusion criteria we confirmed. Give the source for each criterion and list unconfirmed suggestions separately.
Reader searches the referenced saved conversations and supplies relevant evidence to the main Agent. Its scope is those conversation records. To read a new paper, provide the PDF, text, or other accessible material.
Reviewer and Reader are absent from the ordinary conversation Specialist picker. They operate through their review and reference flows; you do not switch the conversation persona to either one first.
Scientific Illustrator works best with a clear purpose, source, and output format.
Create a conversation and choose Agent menu → Specialist → Scientific Illustrator before the first message. For example:
Create an editable SVG workflow diagram for a lab meeting, saved to figures/sample-workflow.svg. Show sample collection, RNA extraction, library preparation, sequencing, and data analysis in a horizontal layout. This is a methods illustration: add no sample counts or experimental conclusions. Inspect the preview for readable labels and arrows.
This Specialist includes figure-style and figure-composer in its initial Skill selection. An explicit request for SVG, vector output, or an editable figure uses direct SVG creation with a PNG preview for visual checking. An explicit PNG or image-model request requires a configured image-generation model.
Without an explicit format, it prefers PNG image-model generation when that tool is available and otherwise uses SVG. Ask for “editable SVG” when you need to revise labels and layout later. For data plots, also provide real data, column names, units, groups, and statistical requirements.
Create a custom Specialist with Write from scratch.
Open Settings → Specialists → Add specialist → Write from scratch. A simple example is:
| Field | Example |
|---|---|
| Name | Paper reading assistant |
| Description | Prepare reading notes from supplied papers, retaining evidence locations |
| Model | Start with Follow active model, or bind a configured chat model |
| Skills | Initially keep Inherit project settings; narrow the selection when needed |
The name is required. Instructions are optional, but concrete requirements make the role easier to reuse and evaluate. Paste this into Instructions:
You are my paper reading assistant, preparing verifiable notes for lab meetings.

First establish whether I supplied the full paper, an abstract, or excerpts,
and state that scope in the notes.
Organize the notes into research question, materials and methods, key results,
limitations, and implications for our project.
Locate key results by page, section, or figure when available; otherwise say
that the supplied material lacks location information.
Separate the authors' findings from your interpretations. Do not invent data
or conclusions. Mark missing conditions, sample counts, or statistical methods
as "not provided in the material."
Save to my requested location, or a new file under notes/papers/ if unspecified.
Finish with questions requiring source verification and the saved file path.
Click Save. The Specialist appears under Custom. Click its name to edit it later; custom Specialists can also be deleted from the list.
After turning off Skill inheritance, explicitly select the Skills you need.
With Inherit project settings checked, the Specialist follows the project’s Skill configuration. Uncheck it to search for and select particular Skills. Selected Skills appear above the search results and can be removed.
Turning inheritance off and selecting nothing means no Skills. It does not select every Skill automatically.
If you created and imported lab-paper-note from the Skills tutorial, search for it and select it to pair that template with the reading assistant. Skills must already be installed and discoverable; writing Specialist instructions does not install dependencies.
Create through a conversation when you want help defining the role.
Add specialist → Chat with Claude opens a new conversation and automatically sends an interview request about purpose, tone, working style, Skills, data sources, and model tier. This uses a model, so configure one first.
You could answer:
Create a “Lab meeting assistant” that prepares outlines from the papers and experiment records I provide. Keep the writing concise. First ask about presentation length and the audience, then organize the research question, methods, main results, and discussion points. Cite the supplied material for data and claims, and never invent missing data. Inherit project Skills and follow the active model for now. Save these requirements as a Specialist.
The flow asks the Agent to call save_specialist. Afterwards, return to Settings → Specialists → Custom, confirm the new entry exists, and inspect its instructions, model, and Skills.
If the conversation produced only a role description, ask it to save the configuration as a Specialist. Use a separate new conversation to try the saved role.
Select the saved Specialist before the first message.
- Return to the project and create a new conversation.
- Before sending anything, open Agent menu → Specialist in the composer.
- Select “Paper reading assistant” and check that its name appears at the top of the conversation.
- Attach a paper or excerpt and describe the task.
For example:
Prepare reading notes from the attached abstract, focusing on the research question and key results. Use only information supported by this abstract and save the notes under notes/papers/.
The Specialist choice locks after the first message. Start another conversation to choose a different Specialist or None. Saving a role in Settings does not switch an existing conversation to it.
Ordinary Specialist personas run in Wisp’s native Agent. Reviewer’s separate ACP backend support does not imply that every custom persona’s instructions and Skills are passed to external ACP Agents.
Validate the role with material you already know.
Try a familiar abstract and check the requested structure, evidence locations, and treatment of missing information. Add concrete corrections to the instructions and test again in a new conversation.
| Symptom | First check |
|---|---|
| A saved Specialist is not being used | Did you select it in a new conversation before its first message? |
| The Specialist menu is disabled | Has the conversation already received a message? |
| Reviewer or Reader is missing from the picker | Use review or project/conversation references instead |
| Expected Skills are absent | Check inheritance, selections, installation, and discovery |
| Chat creation produced no list entry | Verify that saving completed; ask the Agent to save if necessary |
| A figure has the wrong format | Explicitly request SVG or PNG and configure image generation when needed |
Start with one role you use every week. Save stable requirements in the Specialist, keep changing materials and goals in each message, and refine the instructions from actual results.
This tutorial reflects the Wisp Science implementation at writing time. Prompts and file paths are teaching examples, not completed research tasks. Interface labels may differ between versions.