
Wisp Science高级用法:创建 Agent Workflow
查看原文上一篇 Agent Workflow 介绍了四个内置工作流。当你反复用同一套分工检查研究方案、整理证据或准备组会时,可以把这套安排保存成自己的工作流。
这一篇从一个完整的小例子开始:创建“研究论证检查”,让两个任务独立梳理论点和检查证据,最后由第三个任务给出修改建议。先掌握目标、节点、能力、依赖和保存,再介绍从已有模板修改,以及从 Skill 转换。
本文配图使用当前实际前端与本地示例数据,展示配置操作;没有调用模型、检索论文或执行真实科研任务。示例只处理消息中提供的文字,完成初次练习不需要配置文献数据库或代码运行环境。
先决定交付什么,再把任务拆成节点。
“检查一下这段研究论证”仍然太宽泛。可以先把最终交付写成一句话:
根据我提供的研究段落和证据摘要,输出“原判断、证据支持程度、建议表述、待验证问题”四列表格,并给出三项优先修改。
再倒推需要的分工:
| 任务 ID | 负责什么 | 依赖谁 | 能力 |
|---|---|---|---|
claims |
提取主要判断,区分事实、相关性与因果推测 | 无 | reasoning |
evidence_check |
独立检查证据范围、限制和替代解释 | 无 | reasoning |
synthesis |
对照两路结果,生成修改建议 | claims、evidence_check |
reasoning |
前两个任务都读取本轮提供的段落与证据摘要,可以独立进行。第二个任务不需要等待第一个任务的编号,而是引用原文短句;汇总任务再负责对应两路结果。这样才能真正形成“两路独立检查 → 汇总”的结构。
进入“设置 → 工作流 → 新建工作流”,选择创建方式。
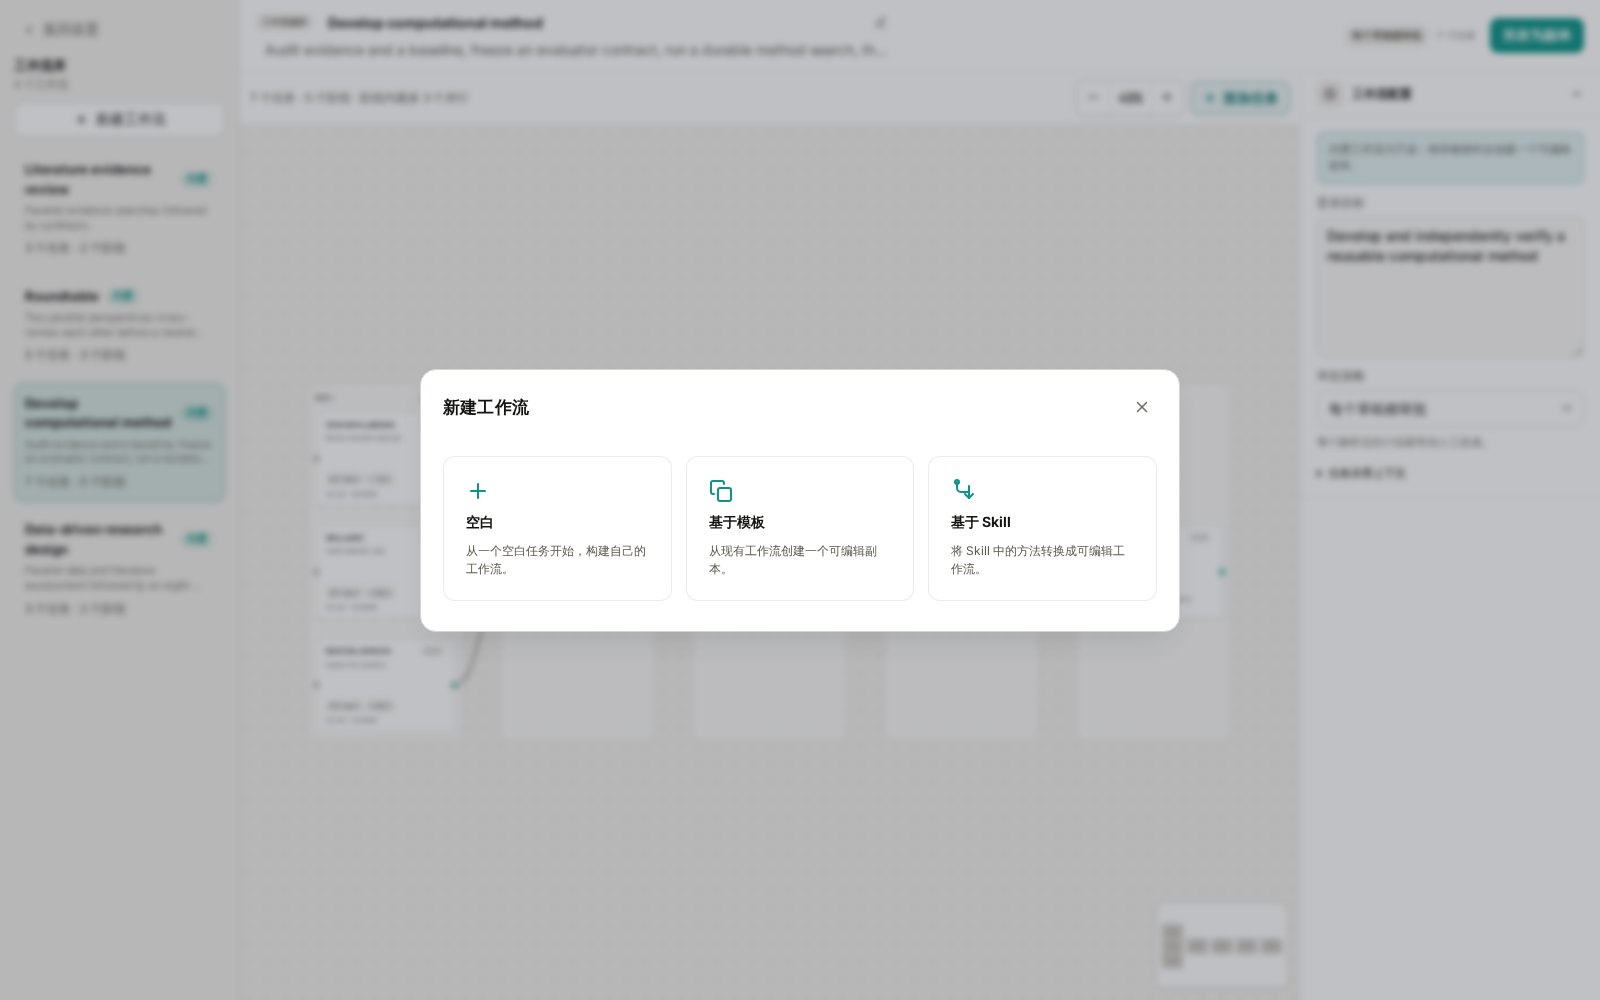
图 1:三条创建路径都在同一个入口。本文先选择“空白”。
| 创建方式 | 适合什么时候使用 |
|---|---|
| 空白 | 已经想清楚分工,希望逐项填写 |
| 基于模板 | 内置或已保存的工作流与需求接近,只需局部修改 |
| 基于 Skill | 已有方法文档,希望模型帮忙拆成独立任务图 |
前两种方式编辑配置本身不需要模型生成;“基于 Skill”在生成草稿时会调用所选模型。无论哪条路径,保存之后都需要回到会话中选中工作流并发送任务,才会开始执行。
第一步:填写名称、委派目标和共享上下文。
选择 空白 后,画布会出现一个初始任务。先填写工作流级别的配置:
| 字段 | 本例内容 |
|---|---|
| 工作流名称 | 研究论证检查 |
| 描述 | 独立梳理论点和核查证据,再汇总修改建议。 |
| 委派目标 | 根据本轮提供的段落和证据摘要,检查论证是否充分,输出有依据的修改建议。 |
| 审批策略 | 每个草稿都审批 |
展开右侧的 任务共享上下文,填入所有任务都应遵循的要求:
只使用本轮材料;缺失信息标为“材料未提供”。
不补写文献、数据或已完成的实验。不写入项目文件。
名称和描述帮助你在工作流库中识别模板,实际执行要求应写进目标、共享上下文和节点指令。固定规范放在模板里,每次变化的研究段落、证据摘要和问题留在发送时的消息中。
第二步:把初始节点改成 claims。
双击画布中的初始节点,或单击后选择 编辑节点,打开任务详情。保持节点类型为 Agent,把任务 ID 改为 claims,填写:
读取本轮提供的研究段落。逐条列出主要判断,编号 C1、C2……,
区分观察事实、相关性描述和因果推测。
保留对应原文短句;不判断未提供的证据。
展开 能力,保留 Reasoning(reasoning)。这个任务只需要处理已提供的文字。专家人格可以保持“临时 Agent”,高级执行控制先使用默认值,不需要为每个节点创建一个专家。
关闭任务详情后,修改会保留在当前编辑草稿中。关闭节点窗口并不等于保存整个工作流,最后仍要点击顶部的“保存工作流”。
第三步:添加独立的 evidence_check 节点。
打开画布工具栏的 添加任务,选择 独立任务,会自动打开新节点的编辑窗口。将 ID 改为 evidence_check,同样使用 reasoning,填写:
独立检查本轮段落与证据摘要。
列出各项证据能够支持的范围、限制和替代解释,引用对应原文短句。
缺少样本量、对照或统计信息时明确标注,不补造结果。
这两个节点都应显示为无前置依赖。它们收到相同材料,但承担不同任务。不要仅把同一条“全面分析”指令复制两次,否则容易得到重复内容。
第四步:添加 synthesis,并连接两个上游任务。
再添加一个独立任务,ID 填 synthesis,能力仍为 reasoning,指令填写:
读取 claims 和 evidence_check 的依赖结果。
逐条对应主张与证据,输出“原判断、证据支持程度、建议表述、待验证问题”
四列表格。保留分歧,不新增来源,最后给出三项优先修改。
在这个节点的详情里展开 编辑依赖,勾选 claims 和 evidence_check。
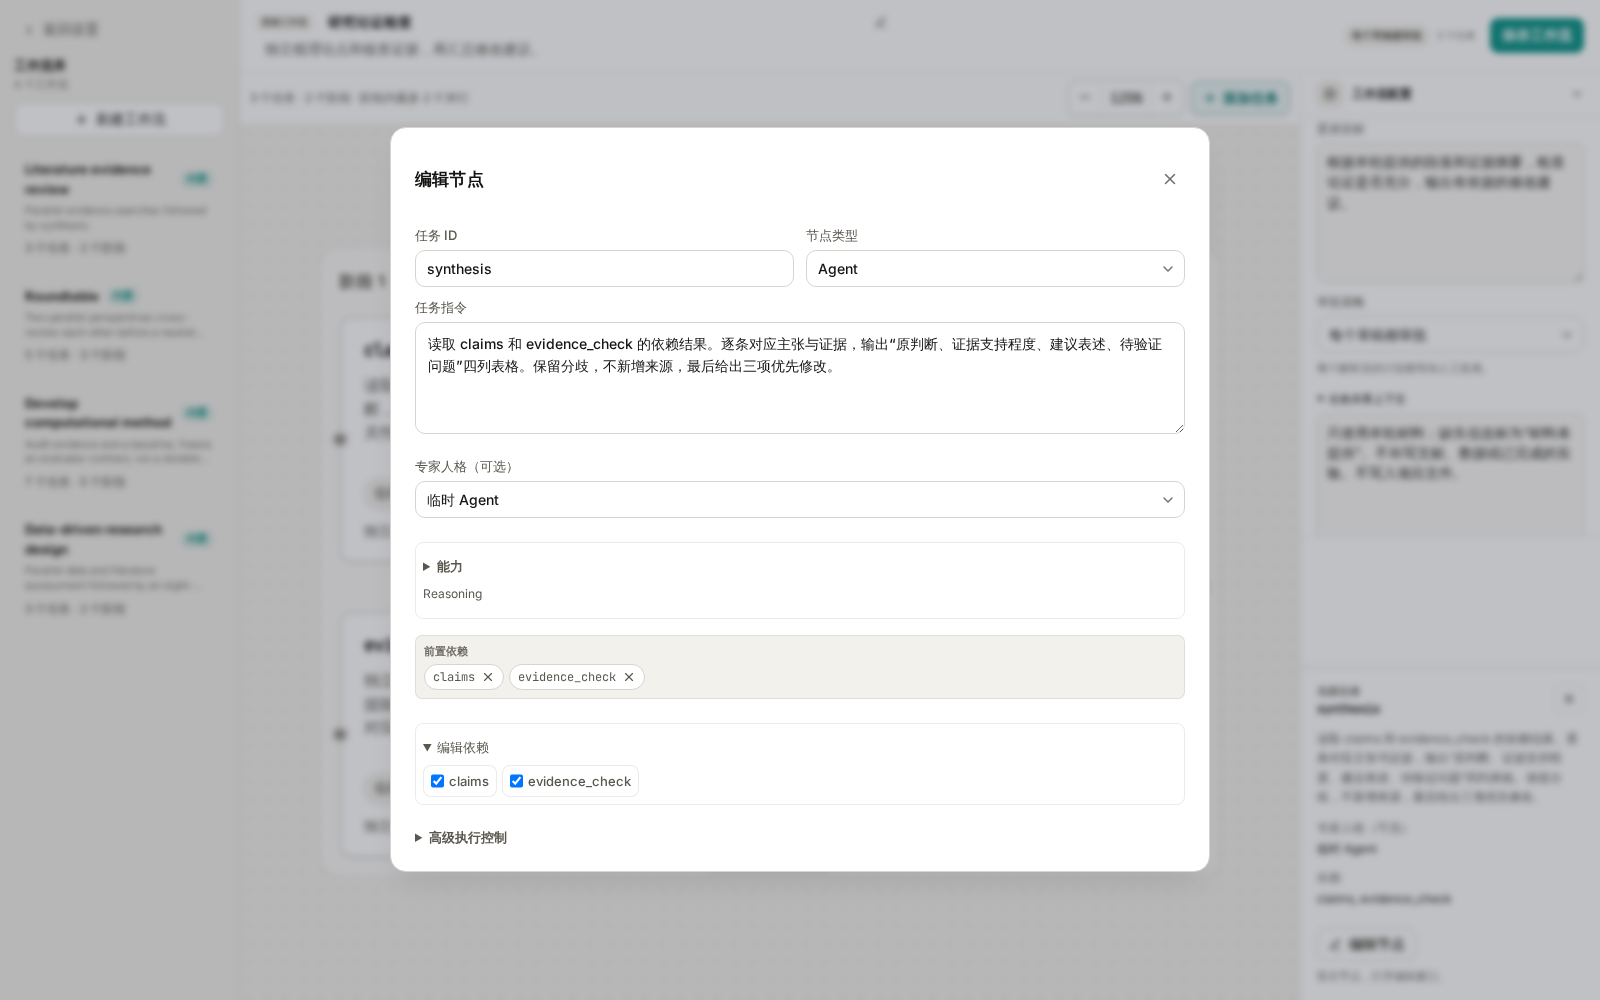
图 2:依赖要在配置中明确选中。只在指令里写“等前面完成”不会自动建立连线。
也可以在画布中,从上游节点的输出端点拖到下游节点建立连线;使用“接在选中节点后”则会创建一个依赖所选节点的新任务。无论用哪种方式,本例的汇总节点都必须同时依赖两个上游。
关闭详情后,画布应显示 3 个任务、2 个阶段、最多 2 个并行节点:左侧是 claims 与 evidence_check,右侧是 synthesis,两条箭头都指向汇总节点。
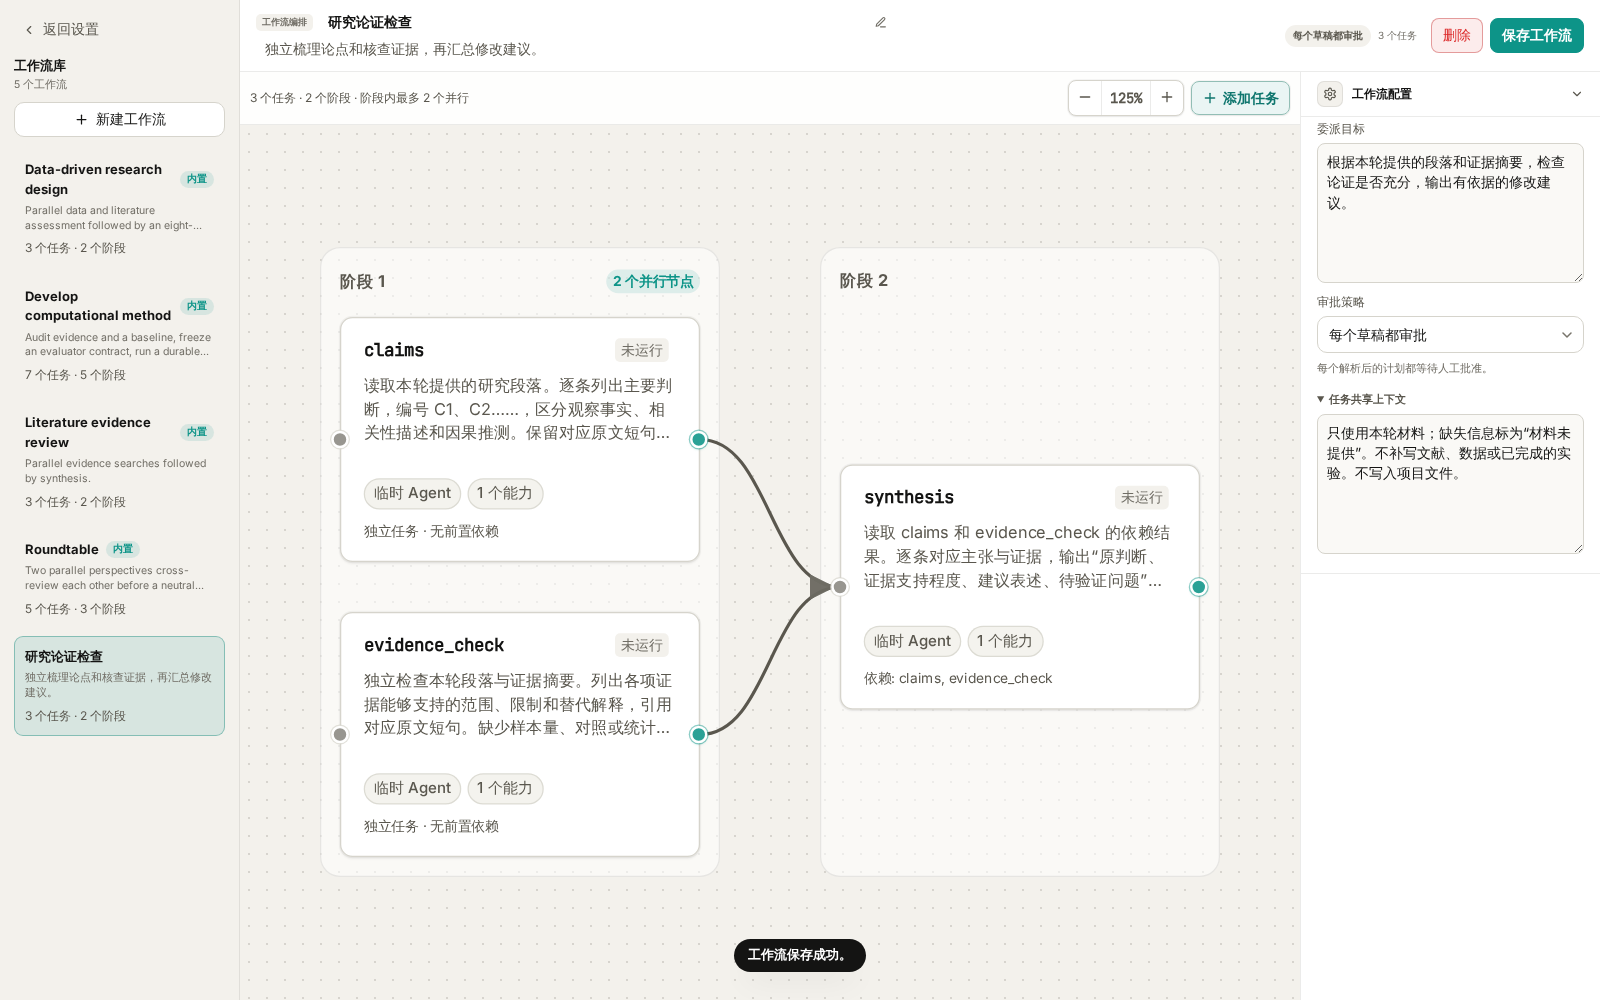
图 3:完整示例。连线表达执行依赖;实际并发仍受执行策略限制。
任务 ID 应唯一,建议使用简短、稳定的英文名称。依赖必须保持无环,不能再从 synthesis 连回 claims。需要返工时,先根据本轮结果调整输入或模板,再发起下一次任务。
第五步:保存,并用一段熟悉的材料试运行。
点击顶部 保存工作流,确认出现保存成功提示,左侧库中能看到“研究论证检查”。如果保存按钮不可用,查看顶部附近的原因提示,通常是名称、目标、任务指令或能力尚未填写完整。
回到项目会话,在输入框输入 /,搜索并选中“研究论证检查”,再发送一段包含原文和证据范围的消息。例如:
请按所选工作流检查下面这段论证,只使用本条消息的材料。

研究段落:处理组中基因 X 的表达较高,因此基因 X 是该处理引起表型变化的原因。
证据摘要:目前只有表达量比较,未提供样本量、统计检验结果、功能扰动或救援实验。

请指出哪些表达可以保留,哪些应改为假设,以及还需补充什么证据。
这是一段刻意保留证据缺口的练习材料,不代表真实实验结果。出现工作流草稿后,审阅三个节点及其依赖,点击 批准并运行。
在 Agents 面板中检查:两个独立任务是否各自完成了职责,汇总是否读到了双方结果,最终建议是否保留材料缺口。先用熟悉的材料检查输出,比一开始就接入大量数据更容易判断配置是否有效。
保存模板、批准一次计划、执行一次工作流是三个不同动作。修改模板后,下一次使用时采用保存后的版本;不要把编辑模板当作修改已经批准的运行计划。
需要扩展时,再按任务增加能力和输出约束。
本例只使用消息里的材料,所以三个节点都用 reasoning。如果改成检查项目文件或主动检索文献,应同时调整输入说明、节点指令与能力。
| 新需求 | 配置方向 |
|---|---|
| 读取项目中的报告 | 为相应节点添加 project_read,明确文件路径 |
| 查找真实文献 | 为检索节点选择可用的 literature_search,配置连接器并规定核验方式 |
| 保存整理后的报告 | 为负责保存的节点添加 project_write,规定输出路径与覆盖规则 |
| 实际运行分析代码 | 使用 code_run,写清环境、输入和执行边界 |
能力决定节点可以申请哪些工具,填写指令不会自动开放工具或安装依赖。把读取、计算、保存等要求交给明确的节点,也更容易定位失败原因。
需要机器可读的交付时,可以配置 输出 JSON Schema。例如,汇总节点输出 claims 数组和 next_steps 数组,就应在指令里同步说明字段含义。第一次使用先保留默认输出格式,把内容要求写清楚即可。
高级执行控制 可以选择执行器、模型和预算。初次创建先用默认执行器与模型;需要成本上限时再填写最大 Token 数、工具调用数或费用。预算留空表示不限制;最长运行时间留空使用策略默认值,填 0 表示不限时。运行活动有单独的输入和预算规则,不能直接套用 Agent 节点配置。
第二条创建路径:基于已有模板做局部修改。
打开 新建工作流 → 基于模板,选择一个接近需求的模板。例如,选 Roundtable,把新工作流命名为“组会方案讨论”,填写实验室共享约束,再调整对应席位的指令。
也可以直接打开内置模板进行修改,再点击 另存为副本。内置模板会保留,后续需要选择你保存的副本才能使用新规则。
复制后先核对每个阶段的角色:开场负责提出立场,交叉审阅负责回应双方观点,主席负责综合。修改同一席位的角色时,要同步检查它的开场和审阅节点。需要固定的角色规范,再选择已经配置好的专家。
第三条创建路径:把 Skill 中的方法转换成工作流。
如果已经有可用的 Skill,进入 新建工作流 → 基于 Skill。在“将 Skill 转换为工作流”窗口中填写研究需求,选择来源方法和转换模型。
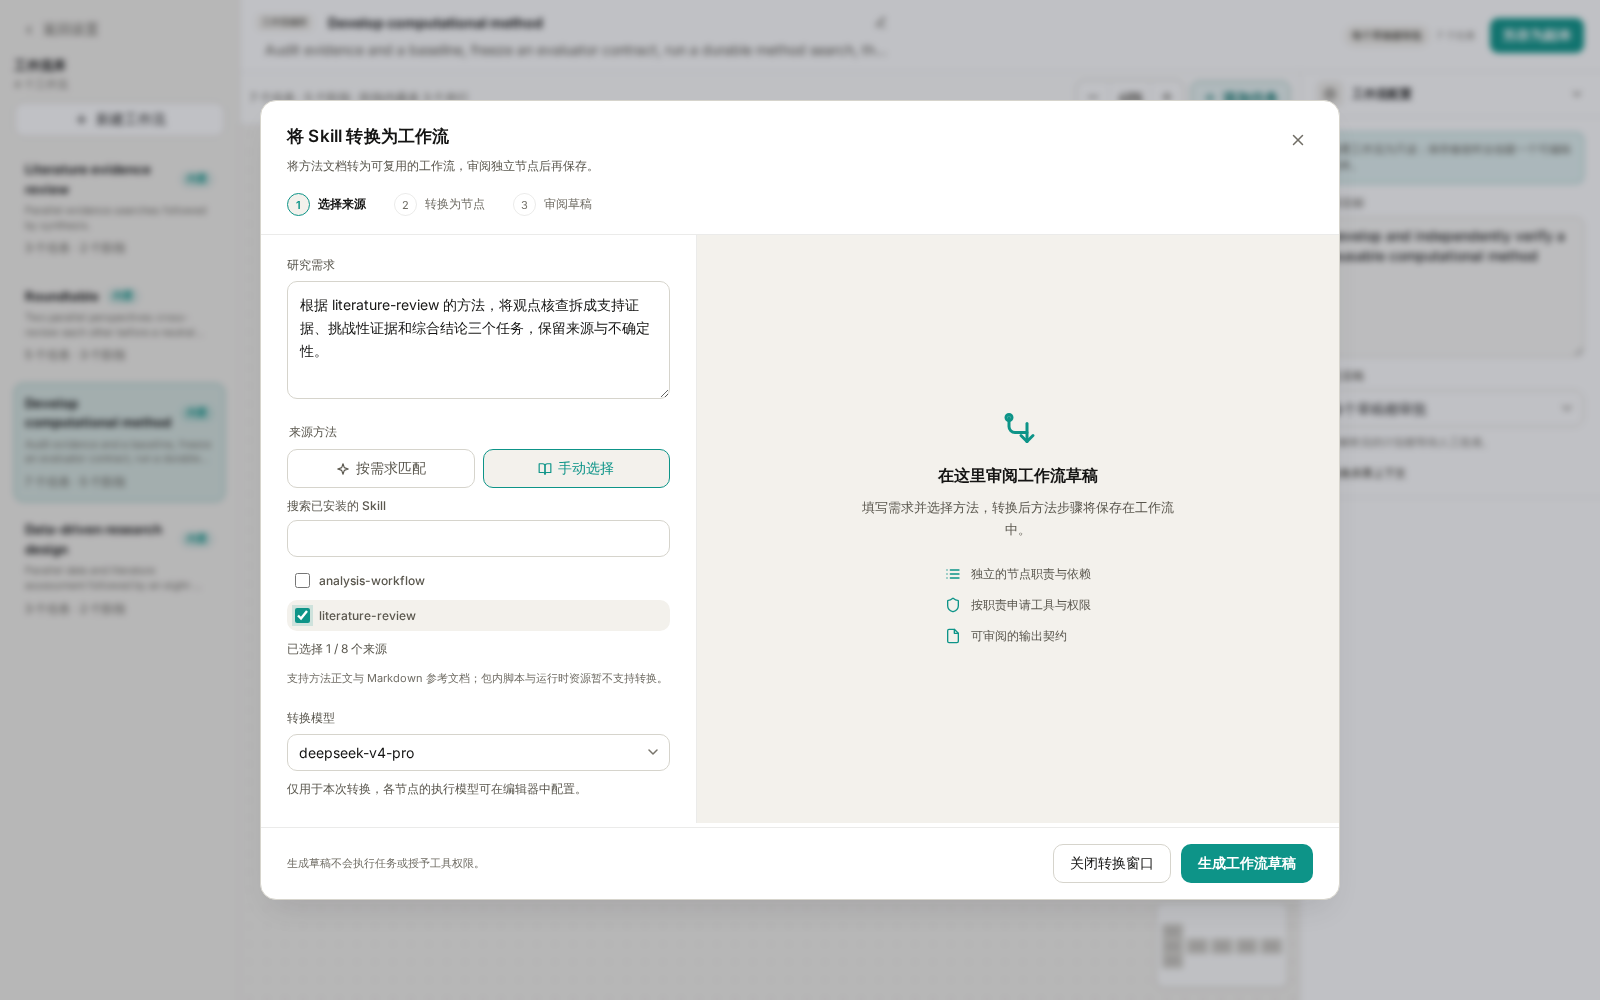
图 4:示例选择 literature-review 作为来源方法。截图停在生成前,没有调用转换模型。
来源方法可以自动选择,也可以切换为手动选择并搜索技能;手动最多选择 8 个。第一次选一个范围明确的方法即可,例如 literature-review,研究需求可以写:
根据 literature-review 的方法,将观点核查拆成支持证据、挑战性证据和综合结论三个任务。保留文献核验、来源和不确定性要求。两路检索可独立进行,综合必须依赖双方结果。请生成可复用工作流,不把本次主题或路径固定在模板中。
选择已配置的 转换模型 后,点击 生成工作流草稿。这一步会产生模型调用,用于读取和转换方法,尚未执行生成的科研工作流。
草稿返回后,先读节点指令、依赖、申请的权限和输出要求,再点击 使用草稿并编辑。进入编辑器后补齐名称,按需要调整配置并保存;之后仍通过会话中的 / 入口启动。
当前转换支持方法正文和 Markdown 参考文档,包内脚本、运行时等资源暂不支持转换。转换得到的节点应包含独立、可执行的工作说明。来源 Skill 用于提供方法材料,并不是把 Skill 名称挂在节点上就能完成配置。以后修改源 Skill,也不要假定已经保存的模板会自动同步;需要重新转换或手动更新。
排查配置问题时,先从具体节点开始。
| 现象 | 优先检查 |
|---|---|
| 保存按钮不可用 | 顶部原因提示;名称、目标、ID、指令和能力是否齐全 |
| 两个节点总在重复回答 | 是否承担不同职责,是否写清各自的交付内容 |
| 汇总没有使用某一路结果 | 是否真的配置了依赖,而不只是提到了任务名称 |
| 节点无法读取文件或检索 | 是否选择相应能力;路径、连接器和环境是否可用 |
| 改完节点,重新打开却没有变化 | 是否点击了“保存工作流”;运行时是否选择正确副本 |
| Skill 转换按钮不可用 | 是否填写需求、选择有效来源和已配置的转换模型 |
| 生成草稿后没有自动执行 | 先使用草稿并编辑、保存,再回到会话选择并发送 |
当“研究论证检查”已经能稳定处理你的材料,再考虑增加检索、文件输出或其他角色。每增加一个节点,都应能说清它提供了什么新结果,以及谁会使用这个结果。
本文与 内置工作流用法 配套。更底层的执行与审批机制见 Agent delegation;需要将模板绑定到选中文字入口时,参见 快捷动作。
The previous Agent Workflow tutorial introduced four built-ins. When the same division of work repeatedly helps you review research plans, examine evidence, or prepare meetings, save it as your own workflow.
This tutorial builds a complete small example: Research argument review. Two tasks independently extract claims and examine evidence; a third proposes revisions. It then covers copying a template and converting a Skill into a workflow.
Screenshots use the current frontend with local fixture data. No model calls, paper searches, or real research tasks were executed. The example uses only text supplied in the request, so it does not require a literature connector or code runtime.
Define the deliverable before creating nodes.
Make “review this argument” concrete:
Using the supplied passage and evidence summary, return a table with original claim, evidence strength, suggested wording, and open questions, followed by three priority revisions.
Then define the division of work:
| Task ID | Responsibility | Dependencies | Capability |
|---|---|---|---|
claims |
Extract claims; distinguish observations, correlations, and causal inference | None | reasoning |
evidence_check |
Independently assess support, limitations, and alternatives | None | reasoning |
synthesis |
Reconcile the two results and propose revisions | claims, evidence_check |
reasoning |
Both initial tasks receive the passage and evidence summary. The second cites source excerpts rather than waiting for claim IDs from the first. Synthesis matches their results. This makes the two reviews genuinely independent tasks in the graph.
Open Settings → Workflows → New workflow.
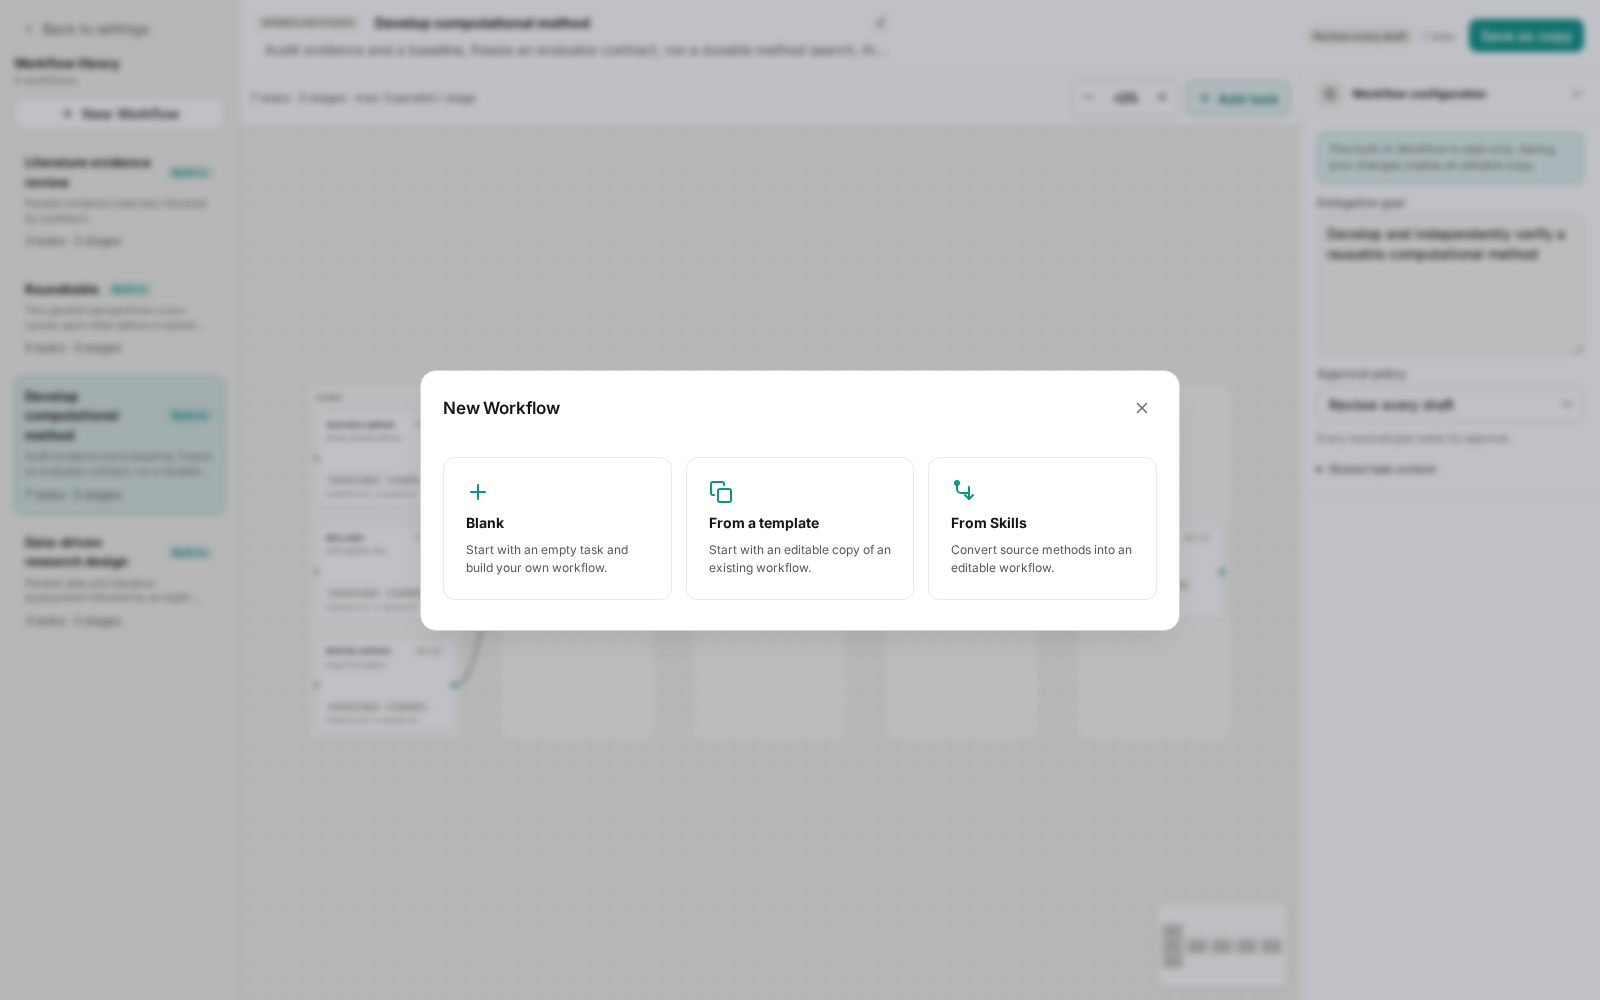
Figure 1: All three creation routes share this entry point. Start with Blank for this example.
| Route | When to use it |
|---|---|
| Blank | You already know the division of work |
| From a template | An existing workflow is close to your needs |
| From Skills | You have a method document and want a model to turn it into independent tasks |
Editing a blank workflow or template does not require model generation. Skill conversion calls the selected model when generating a draft. All routes require saving and then selecting the workflow in a conversation to execute it.
Step 1: fill in the name, goal, and shared context.
Choose Blank. One initial task appears. Fill in the workflow-level configuration:
| Field | Example |
|---|---|
| Name | Research argument review |
| Description | Extract claims and examine evidence independently, then propose revisions. |
| Delegation goal | Review the supplied passage and evidence summary; return evidence-grounded revisions. |
| Approval policy | Review every draft |
Expand Shared task context on the right and enter:
Use only supplied material. Mark missing information explicitly.
Do not invent sources, data, or completed experiments. Do not write project files.
Name and description identify the template. Execution instructions belong in the goal, context, and nodes. Store recurring rules in the template; provide the changing passage, evidence summary, and question when sending each request.
Step 2: turn the initial node into claims.
Double-click the initial node, or select it and choose Edit node. Keep its type as Agent, change its ID to claims, and enter:
Extract and number claims C1, C2, etc. from the supplied research passage.
Distinguish observations, correlations, and causal inference.
Quote the relevant passage; do not infer missing evidence.
Expand Capabilities and keep Reasoning (reasoning). This node only processes supplied text. Keep the temporary Agent role and default execution controls; creating a specialist for each task is unnecessary.
Closing task details preserves edits in the current draft. It does not save the entire workflow. Use the top-level save action after finishing the configuration.
Step 3: add an independent evidence_check node.
Open Add task in the graph toolbar and choose Independent task. Its editor opens automatically. Set its ID to evidence_check, keep reasoning, and enter:
Independently review the passage and evidence summary.
Identify support, limits, and alternative explanations with source excerpts.
Flag missing sample sizes, controls, or statistics; invent no results.
Both nodes should have no incoming dependencies. They receive the same material but have different responsibilities. Duplicating a vague “analyze everything” instruction would usually produce redundant work.
Step 4: add synthesis and connect both upstream tasks.
Add another independent task with ID synthesis and capability reasoning. Enter:
Read the claims and evidence_check dependency results.
Match claims to evidence and return a table of original claim, evidence strength,
suggested wording, and open questions. Preserve disagreement, add no new sources,
and finish with three priority revisions.
Expand Edit dependencies in this node's details and select both claims and evidence_check.
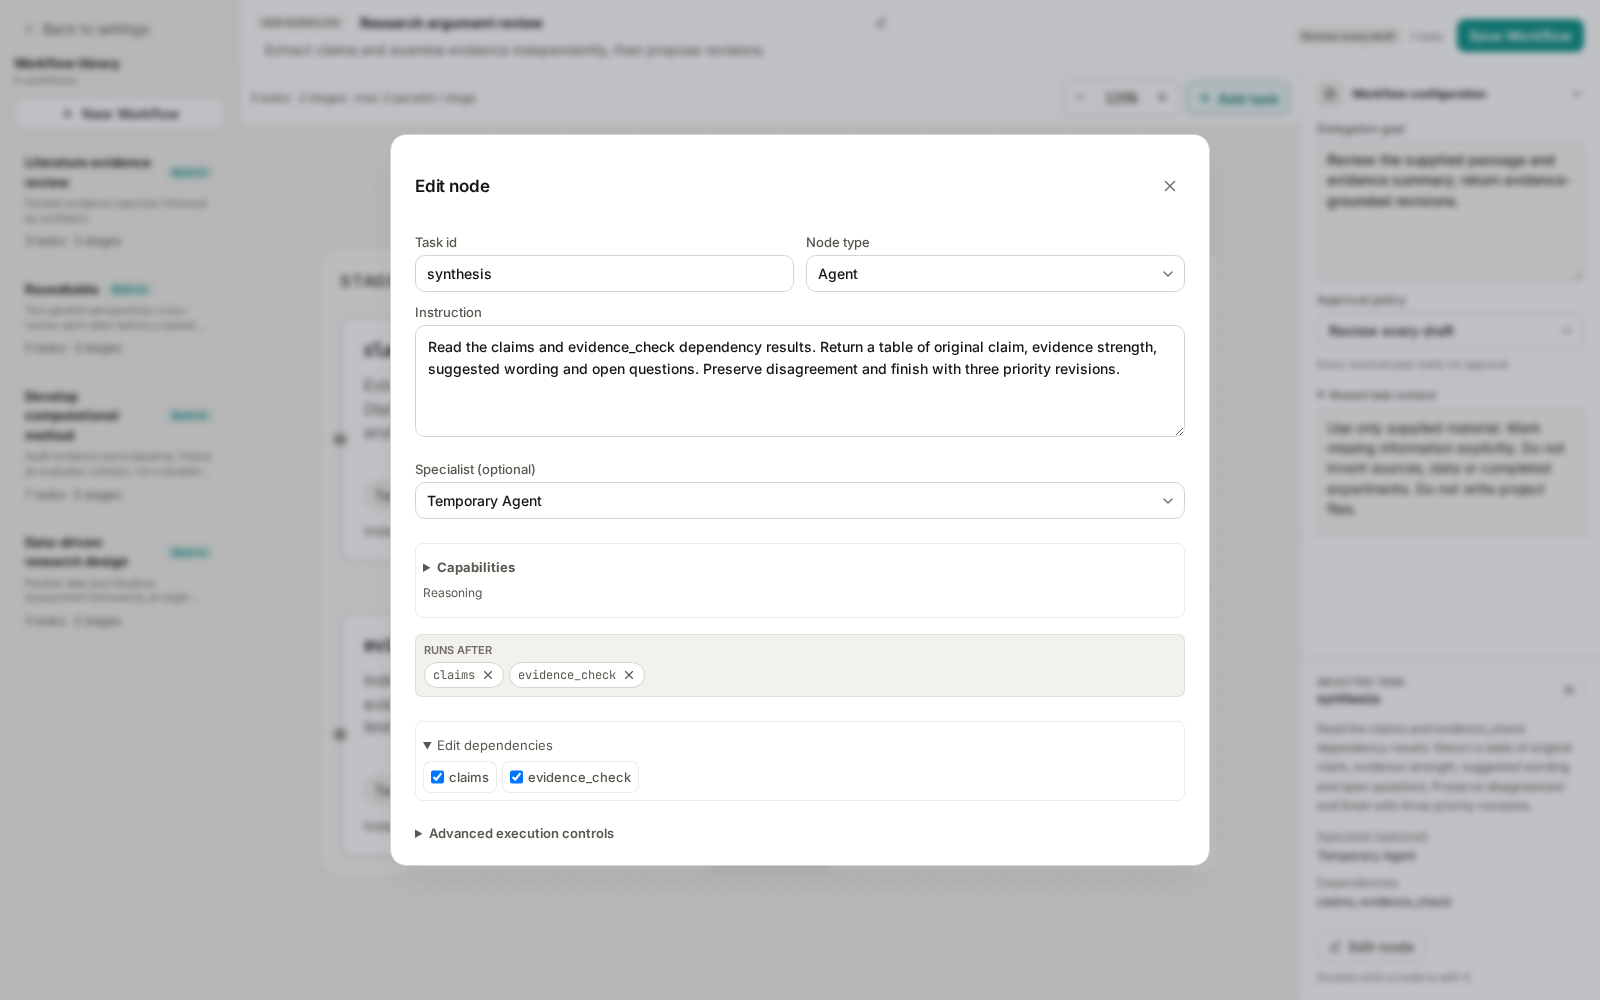
Figure 2: Select dependencies explicitly. Writing “wait for previous tasks” in prose does not create graph edges.
Alternatively, drag an upstream output handle to a downstream node. Add after selected creates a new task with a dependency on the selected node. Whichever method you use, this synthesis task must depend on both upstream tasks.
Close the details window. The graph should show three tasks, two stages, and at most two parallel nodes: claims and evidence_check on the left, synthesis on the right, and two arrows into synthesis.
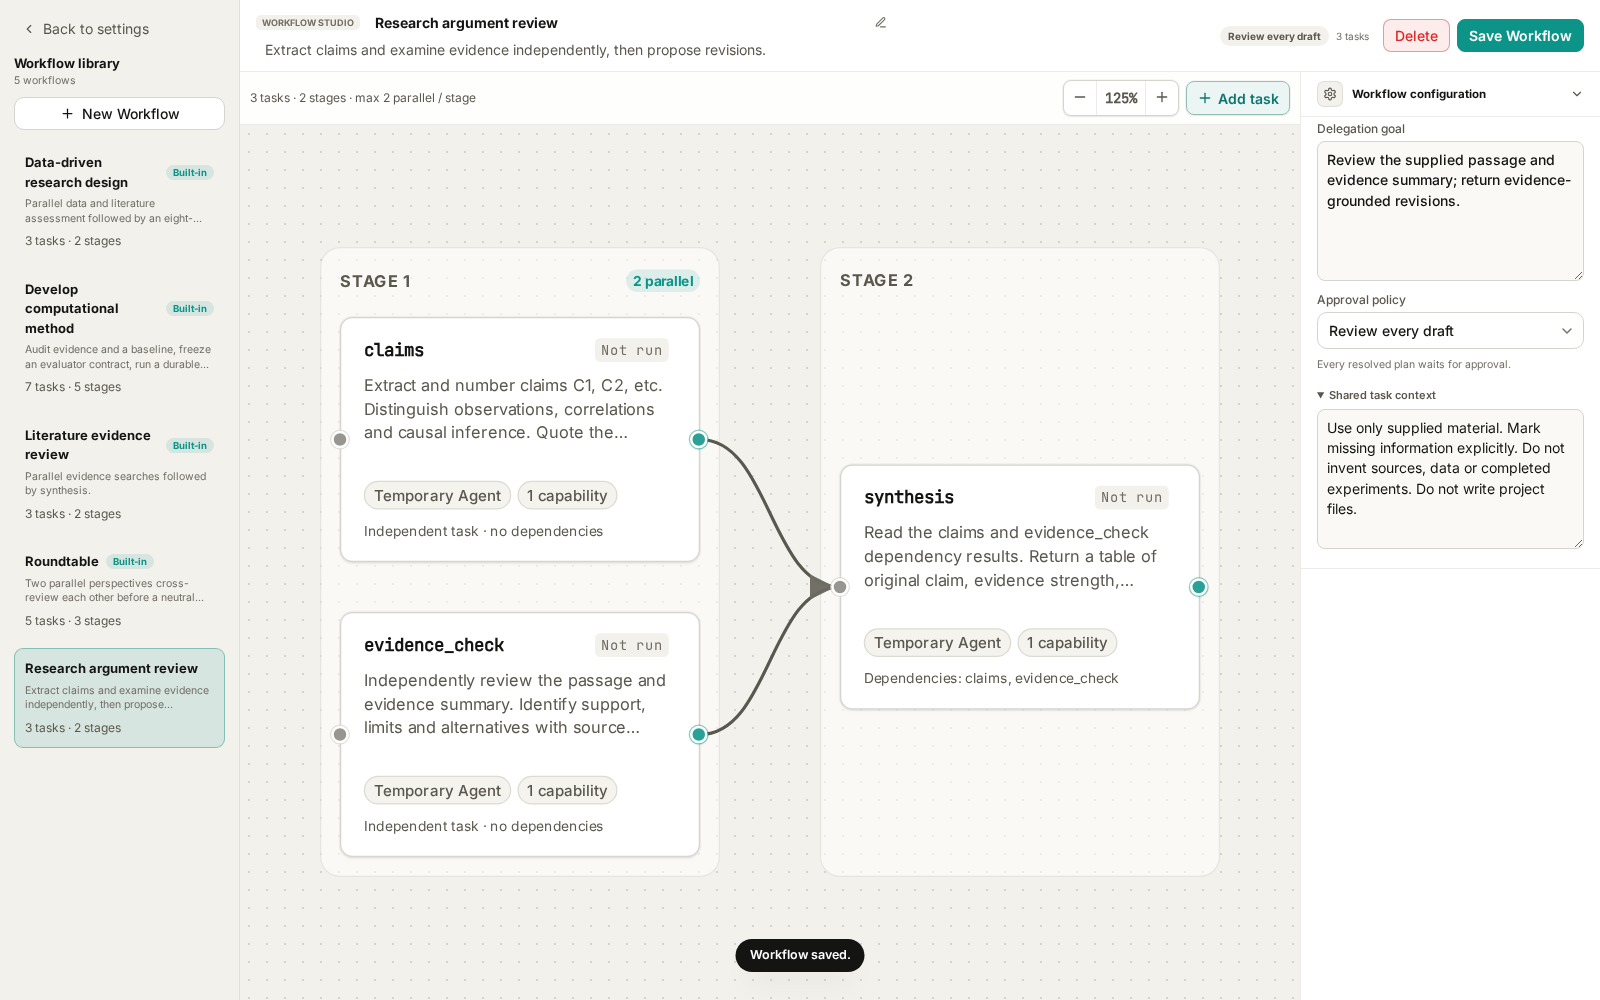
Figure 3: The complete example. Edges express dependencies; execution policy still controls actual concurrency.
Use unique, short, stable task IDs. Keep dependencies acyclic: do not connect synthesis back to claims. For another revision cycle, adjust the input or template and start a new request.
Step 5: save and try familiar material.
Choose Save workflow and confirm the success message and the new library entry. If save is disabled, read the reason near the header. Common causes include missing name, goal, instructions, or capabilities.
Return to a project conversation, type /, and select “Research argument review.” Send:
Review the following argument using the selected workflow and only this material.

Passage: Gene X has higher expression in the treatment group; therefore gene X
causes the phenotype change induced by treatment.

Evidence summary: Only an expression comparison is available. Sample size,
statistical test results, functional perturbation, and rescue experiments
have not been supplied.

Which wording can remain, which claims should become hypotheses, and what
additional evidence is needed?
This deliberately incomplete example is not a real experimental result. Review the resulting three-node plan and its dependencies, then choose Approve and run.
In Agents, check whether each task fulfilled its role, whether synthesis used both results, and whether missing evidence remained explicit. Familiar material makes configuration errors easier to identify than a large unfamiliar dataset.
Saving a template, approving a plan, and executing a workflow are separate actions. A saved template change applies to subsequent uses; editing the template does not rewrite an already approved execution plan.
Add capabilities and output contracts when needed.
All three example nodes use reasoning because their inputs are already in the message. For files or active retrieval, update the input description, instructions, and capabilities together.
| New requirement | Configuration direction |
|---|---|
| Read a project report | Add project_read to the relevant node and specify paths |
| Retrieve real publications | Select an available literature_search capability and configure its connector and verification requirements |
| Save the report | Add project_write to the saving node; specify path and overwrite rules |
| Execute analysis | Use code_run with explicit environment, inputs, and boundaries |
Capabilities determine which tools a node may request. Instructions do not automatically grant tools or install dependencies. Assigning reading, execution, and saving to explicit tasks also makes failures easier to diagnose.
For machine-readable results, configure an output JSON Schema and explain the fields in the instructions. For example, synthesis might return claims and next_steps arrays. Initially, keep the default output format and focus on clear content requirements.
Advanced execution controls cover executor, model, and budgets. Begin with defaults. Set maximum tokens, tool calls, or cost when needed. Blank budget fields mean unlimited; blank timeout uses the policy default and 0 means no timeout. Run activities have separate input and budget contracts rather than ordinary Agent controls.
Route two: adapt an existing template.
Choose New workflow → From a template, then select a suitable workflow. For example, copy Roundtable, rename it “Lab meeting planning,” add recurring constraints, and refine participant instructions.
You can also edit a built-in and choose Save as copy. The built-in remains available; select your saved copy to use the revised rules.
Check role consistency across stages. Openings establish positions, cross-reviews respond to both sides, and the chair synthesizes. When changing a participant, update both its opening and review nodes. Select an existing specialist if you need a reusable role definition.
Route three: convert a Skill's method into a workflow.
Choose New workflow → From Skills. Enter a research request and select source methods and a conversion model.
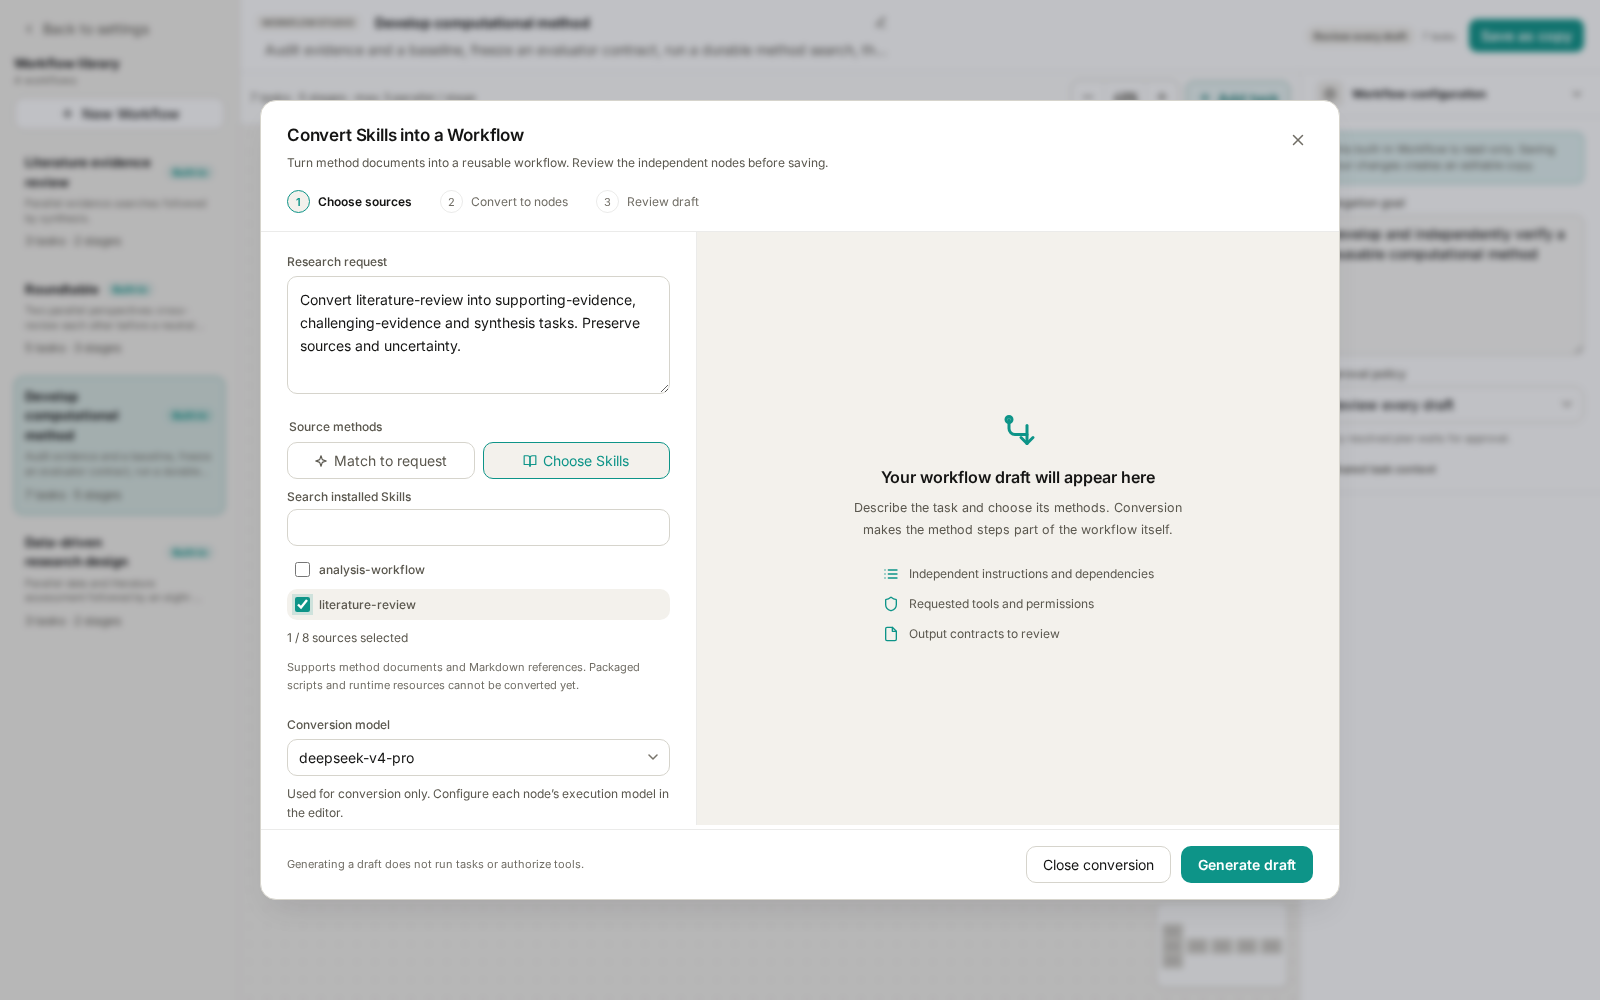
Figure 4: literature-review is the source method. The screenshot stops before generation; no conversion model was called.
Sources can be chosen automatically or manually through search. Manual selection allows up to eight; start with one clearly scoped method, such as literature-review. A request could be:
Convert literature-review into supporting-evidence, challenging-evidence, and synthesis tasks. Preserve citation verification, sources, and uncertainty. Searches should be independent; synthesis must depend on both. Produce a reusable workflow without hard-coding the current topic or paths.
Select a configured conversion model and choose Generate workflow draft. This calls the model to convert the method; it does not execute the resulting research workflow.
Review the draft's instructions, dependencies, requested capabilities, and output contracts, then choose Use draft and edit. Complete its name, revise configuration, and save. Start it later through / in a conversation.
Conversion currently supports method text and Markdown reference documents, not bundled scripts or runtime resources. Converted nodes should contain self-contained executable instructions. The source Skill supplies method material; attaching its name alone is not sufficient configuration. Later changes to the source Skill should not be assumed to update saved templates automatically. Reconvert or edit them explicitly.
Diagnose configuration problems at the affected node.
| Symptom | First check |
|---|---|
| Save is disabled | Header reason; name, goal, IDs, instructions, and capabilities |
| Two nodes repeat each other | Distinct responsibilities and deliverables |
| Synthesis ignores a result | An actual dependency exists, not just a task name in prose |
| A node cannot read or search | Required capability, paths, connector, and environment |
| Edits appear lost | The workflow was saved and the correct copy was selected |
| Conversion cannot start | Request, valid source selection, and a configured model |
| A generated draft does not execute | Use and edit the draft, save it, then select and send it in a conversation |
Once this small workflow handles your material reliably, add retrieval, file outputs, or other roles as needed. For each new node, identify the new result it contributes and which task will use that result.
Companion reading: Built-in workflow usage, Agent delegation, and Quick Actions for binding templates to selected-text actions.